Materials you’ll need:
- Sport/ fine weight yarn- Shachenmayr Catania 100% Cotton, 50 g, 125 m
colors- - Dark orange color(189) 15 gr,
- Light orange color (209) 10gr,
- Amber color (390) 10 gr,
- Light brown color (437) 25gr,
- Light green color (392) 5gr,
- white color 5gr,
- a small amount of Beige for the nose and hands
- crochet hook size 2.5mm
- Poly fiber fill for stuffing
- – tapestry needle
Stitch abbreviation:
SC- single crochet
DC- double crochet
SS- slip stitch
CH- chain
Rep- repeat
Inc- increase
Dec- decrease
MR- magic ring
HDC- half double crochet
– repeat the stitches in the ** indicated times
FO- fasten off
BLO- back loop only
FLO- front loop only
Pumpkin gnome‘s body pattern:
-with amber color
Rnd 1: Start with a MR and make 6 SC into it (6)
Rnd 2: *inc 1* 6 times (12)
Rnd 3: *inc 1, SC in next* 6 times (18)
Rnd 4: *inc 1, SC in next 2* 6 times (24)
Rnd 5: *inc 1, SC in next 3* 6 times (30)
Rnd 6: *inc 1, SC in next 4* 6 times (36)
Rnd 7: *inc 1, SC in next 5* 6 times (42)
Rnd 8: *inc 1, SC in next 6* 6 times (48)
Rnd 9: *SC in next 11, inc 1* 4 times (52)
Rnd 10: SC in each stitch around (52)
Continue on hat’s brim
The next round is worked in Front loop only!
Rnd 11: SC in each stitch around (52)
Rnd 12: *SC in next 3, inc 1* 13 times (65)
Rnd 13: SC in each stitch around (65)
Rnd 14: *SC in next 4, inc 1* 13 times (78)
Rnd 15-16: SC in each stitch around (78). FO.
Continue with light brown color.
Rnd 12: Go back to round 11 and insert your hook in any back loop stitch, pull up a loop, SC in the same stitch, SC in each stitch around (52)


Crochet beach gnome
Rnd 13: *SC in next 12, inc 1* 4 times (56)
Rnd 14: *SC in next 13, inc 1* 4 times (60)
Rnd 15-25: SC in each stitch around (60)
Rnd 26: *SC in next 13, dec 1* 4 times (56)
Rnd 27: SC in each stitch around (56)
Rnd 28: *SC in next 5, dec 1* 8 times (48)
The next round is worked in BLO.
Rnd 29: SC in each stitch around (48)
Rnd 30: *SC in next 4, dec 1* 8 times (40)
Rnd 31: *SC in next 3, dec 1* 8 times (32)
Rnd 32: *SC in next 2, dec 1* 8 times (24)
Rnd 33: *SC in next, dec 1* 8 times (16)
Rnd 34: *dec 1* 8 times (8)
Fasten off and close the gap with a needle.
Crochet pumpkin gnome’s nose:
-with beige color yarn
Rnd 1: Start with a MR and make 6 SC into it. (6)
Rnd 2: 2 SC in each stitch around (12)
Rnd 3: *SC in first, inc 1* 6 times (18)
Rnd 4-5: SC in each stitch around (18)
Rnd 6: *SC in next, dec 1* 6 times. FO. (12)
Crochet pumpkin gnome’s beard:
-with white color yarn
Rnd 1: Start with a MR and make 6 SC into it (6)
Rnd 2: SC in each stitch around (6)
Rnd 3: *inc 1* 6 times (12)
Rnd 4: *inc 1, SC in next 5 * 2 times (14)
Rnd 5: * SC in first, inc 1, sc in next 5 * 2 times (16)
Rnd 6: * SC in next 2, inc 1, SC in next 5* 2 times (18)
Rnd 7: *SC in next 3, inc 1, SC in next 5* 2 times (20)
Rnd 8: *SC in next 4, inc 1, SC in next 5* 2 times (22)
Rnd 9: *SC in next 5, inc 1, SC in next 5* 2 times (24)
Rnd 10-13: SC in each stitch around (24)
Rnd 14: *SC in next 5, dec 1, SC in next 5* 2 times. FO. (22)
Hands (make 2 pieces):
-with beige color
Rnd 1: Start with a MR, and make 6 SC into it (6)
Rnd 2: *inc 1* 6 times (12)
Rnd 3-6: SC in each stitch around (12)
Switch to light brown color
Rnd 7-13: Sc in each stitch around (12)

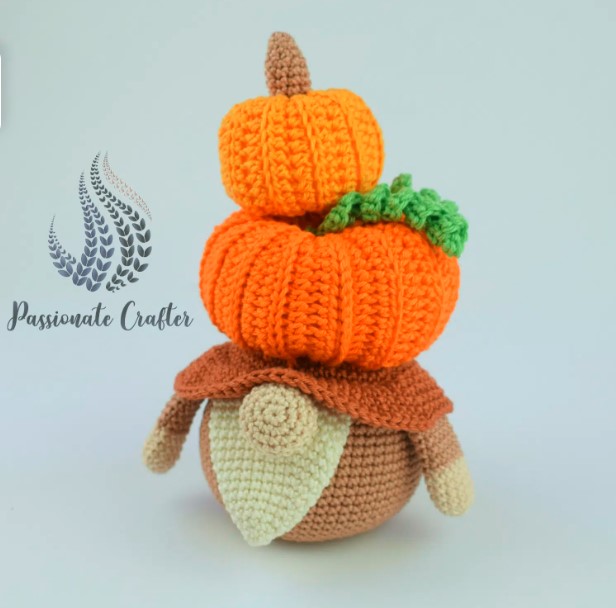
Free crochet pumpkin pattern

Onto the gnome’s head you can attach one or two pumpkins and why not even 3?
The pattern that I used for these crochet pumpkins is – The Easy crochet pumpkin pattern which comes in 3 different sizes.
For those who will make their gnome with only one, you need to follow the instructions for the big-size pumpkin.
To make the gnome with two pumpkins on top you need to follow the instructions for the Big and Medium size pumpkins.
In the pattern, you will also find how to crochet a pumpkin stem and the tendrils. Just follow the same instructions.

Prefer the PDF version?
Grab the ad-free, printable PDF pattern.
Download and print at home. View on your mobile device, tablet, or computer.
How to join your gnome parts:
- Sew the beard onto the body right below the brim.
- Sew the nose on top of the beard. Place it in the center.
- Sew the hands. Leave 3-4 stitches between the beard and hands.
- Sew the big pumpkin onto the head of your gnome. I sew mine only on the ribbed rows skipping the rows between. It will keep the shape of your pumpkin round at the bottom.
- Sew the mini pumpkin on top of your big one. You can place it right in the center or a bit left or right as did I.
- Also, you can also make your gnome using only the big pumpkin.
- Use a safety pin to secure them before sewing. Sew them when you like the placement.


