
Dear friends. Welcome to my amigurumi blog.
Today you will learn with me how to make a cartoon character little red riding hood amigurumi toy. I will share how to do it step by step. The finished crochet amigurumi toy will be approximately 25 cm in size. Isn’t it great? Then let’s continue.
Today I am with you with one of the most loved amigurumi characters, the red riding hood. Little Red Riding Hood doll pattern is totally free. The patterns have a very detailed description. You can go into the topic and examine it. I made a detailed explanation especially for beginners. Very easy. I continue with amigurumi doll patterns. I’ll also be posting a new animal amigurumi pattern in a few days. Keep following me.
Little Red Riding Hood doll Amigurumi free crochet pattern
Designer: @kediperiayolyesi
Copyright Owner: Lovelycraft.com
ABBREVIATIONS OF BASIC TERMS
ch: Chain
Sc: Single Crochet
inc: Increase
dec: Decrease
slst: Slip Stitch
hdc: Half Double Crochet
st/sts: stitch/stitches
dc: Double Crochet
tr: Triple Crochet
BLO: Back Loops Only
FLO: Front Loops Only
Bobble: Bobble Stitch
(): The parentheses at the end of the row give the total number of stitches of that round.
[ ]X..: Repeat instructions x times
Materials
Yarnart Jeans / Skin Color (Color code 73)
Yarnart Jeans / Brown (Color code 71)
Yarnart Jeans / Cream (Color code 03)
Alize Coton Gold / Red (Color code 1243)
9mm Safety Eye (Brown)
For embroidery: Black thread Felting needle
Pins
Size 2.5mm crochet hook
Fiberfill
Stitch Marker
Scissors

** You have finished the first leg. Crochet the second leg in the same way. When you have finished Round 26, make 2 single crochets into the stitches of the second leg to reach the middle. It is important to make the tips of the feet look at each other. Stuff the legs after joining.
For the ruffles of the socks; Join the yarn in the BLO stitches of round 11 and [Dc2, DCinc] repeat 12 (24dc) around. Repeat this process for the other leg.
Rnd 1 start 6sc in a magic ring and join with brown sl st (6) Please look through “Techniques Section” to learn about “Magic Ring” join with a slst. Do not forget to use your stitch marker.
Rnd 2 inc in all sts (12)
Rnd 3-10 sc in all 12 sts (8 rounds)
Rnd 5 BLO sc in the next 8 sts (8)
Rnd 11 BLO sc in the next 12 sts (12)
Please look through the “Techniques Section” to learn about “BLO Technique”
Change to skin color
Rnd 12-15 sc in all 12 sts (4 rounds)
Rnd 16 [dec repeat 2 times], sc in all 3 sts, [dec repeat 2 times], times, sc in all 3 sts (12)
Rnd 17 sc in all 12 sts
Rnd 18 [dec repeat 2 times], sc in all 3 sts, [dec repeat 2 times], times, sc in all 3 sts (12)
Rnd 19-25 sc in all 12 sts (7 rounds)
Change to red color
Rnd 26-28 sc in all 12 sts (3 rounds)

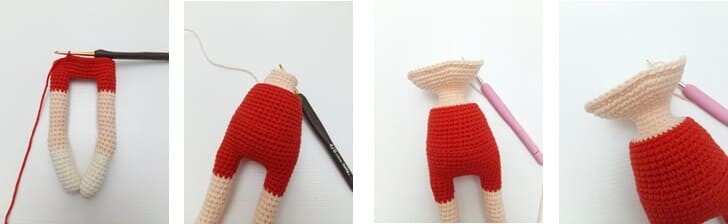
Body
Keep crocheting with red color.
Rnd 29 Ch 8 and join the yarn to the middle of the other leg with a sl st. Sc in the next 12 sts, sc 8 in the next sts using the front loop of the chain stitches, sc in the next 12 sts,sc 8 in the next sts using the remaining loops of the chain stitches(40)
Rnd 30-34 sc in all 40 sts (5 rounds)
Rnd 35 [sc in the next 19 sts, inc] repeat 2 times (42)
Rnd 36-38 sc in all 42 sts (3 rounds)
Rnd 39 BLO sc in the next 42 sts (42)
Start stuffing and keep stuffing as you go on.
Rnd 40 sc in all 42 sts
Rnd 41 [sc in the next 5 sts, dec] repeat 6 times (36)
Rnd 42-48 sc in all 36 sts (7 rounds)
Change to skin color
Rnd 49 BLO sc in the next 36 sts (36)
Rnd 50 [dec] repeat 18 times (18)
Rnd 51-54 sc in all 18 sts (4 rounds)
You have finished the body, do not break the yarn we will crochet the head.
Head (Skin Color)
** Cheeks are formed through Rounds 21-23.Insert the safety eyes in the middle of the face between these cheeks. Insert eyes between Rounds 65 and 66 leaving 8 stitches between them.
Please look through the pictures.
**Stuff the head firmly after inserting the eyes.
For the collar; Join your red yarn into the BLO stitches of Round 49 with a sl-st.
Rnd 55 [sc in the next 2 sts, inc] repeat 6 times (24)
Rnd 56 [sc in the next 3 sts, inc] repeat 6 times (30)
Rnd 57 [sc in the next 4 sts, inc] repeat 6 times (36)
Rnd 58 [sc in the next 5 sts, inc] repeat 6 times (42)
Rnd 59 [sc in the next 6 sts, inc] repeat 6 times (48)
Rnd 60 [sc in the next 7 sts, inc] repeat 6 times (54)
Rnd 61 [sc in the next 8 sts, inc] repeat 6 times (60)
Rnd 62 [sc in the next 8 sts, dec] repeat 6 times (54)
Rnd 63 sc in all 54 sts
Rnd 64 [sc in the next 7 sts, dec] repeat 6 times (48)
Rnd 65 [sc in the next 6 sts, dec] repeat 6 times (42)
Rnd 66-74 sc in all 42 sts (9 rounds)
Rnd 75 [sc in the next 5 sts, dec] repeat 6 times (36)
Rnd 76 [sc in the next 4 sts, dec] repeat 6 times (30)
Rnd 77 [sc in the next 3 sts, dec] repeat 6 times (24)
Rnd 78 [sc in the next 2 sts, dec] repeat 6 times (18)
Rnd 79 [sc in the next st, dec] repeat 6 times (12)
Rnd 80 [dec] repeat 6 times (6)

Skirt (with red color/ cream yarn)
** Join your yarn into the BLO stitches of round 39. Crochet the whole skirt as DC.
Please follow the pictorials.
Rnd 1 Dc2, DCinc4 around (84dc)
Rnd 2-6 sc in all 84 dc (5 rounds)
Change to cream color
Rnd 7-9 sc in all 84 sts (9 rounds)
Change to red color
Rnd 10 Dc around (84)

Arm (with skin color/ red yarn)
Rnd 1 start 5sc in a magic ring and join with brown sl st (5)
Rnd 2 inc in all sts (10)
Rnd 3-5 sc in all 10 sts (3 rounds)
Rnd 6 dec, 6sc, dec (8)
Rnd 7-17 sc in all 8 sts (11 rounds)
With red color
Rnd 18 Work FLO inc around (16)
Rnd 19-23 sc in all 16 sts (5 rounds)
Rnd 24 Dec around (8)
Rnd 25 (dec) x4 (4) Fasten off.

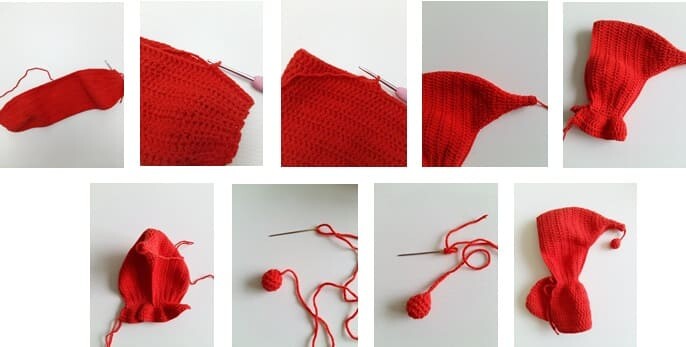
Hood (with red color yarn)
** After the hood is finished, we move to the joint.
We adjust our red rope so that the lower parts of the hood are side by side and we make slst and combine it with 16 sl st.
Fold the hood in half and connect it to the back by making 16 sc drop stitches. Do the hood extension without breaking our rope. I’ll do the dc on the remaining sc. When finished, sew the end part with the needle.
Row 1 Ch 71, turn
Row 2 Starting from the second stitch from the hook; sc in the next 3 sts, Hdc in the next 5 sts, Dc in the next 54 sts, Hdc in the next 5 sts,sc in the next 3 sts, ch 1 and turn (70)
Row 3-12 sc in the next 3 sts, Hdc in the next 5 sts, Dc in the next 54 sts, Hdc in the next 5 sts,sc in the next 3 sts, ch 1 and turn (70) (Repeat for 10 Rounds omitting “ch1 and turn” steps on the LAST repeat)
Row 13 sc in all 16 sts
Row 14 Ch 2, 40Dc (40dc)
Row 15 Dc3, DCdec around (32dc)
Row 16 sc in all 32 Dc
Row 17 Dc2, DCdec around (24dc)
Row 18 sc in all 24 Dc
Row 19 Dc, DCdec around (16dc)
Row 20 sc in all 16 Dc
Row 21 Dc2, DCdec around (12dc)
Row 22 sc in all 12 Dc
Row 23 Dc, DCdec around (8dc)
Row 24-25 sc in all 8 Dc (round 2)
Cape (with red color yarn)
**To crochet the cape; join your yarn to the first stitch of the hood with a sl st.
Row 1 sc in the next 23 sts, ch 2, turn
Row 2 [DCinc] repeat 23 times (46 Dc Stitches)
Row 3-10 ch 2, turn, Dc in the next 46 sts (8 Rows)
Cord (with red color yarn and make 2)
**Join your yarn with a sl st to the side stitch (which take place between hood and cape).Ch 30 and break the yarn. Repeat the same steps for the other cord .
PomPom (with red color)
Rnd 1 start 6sc in a magic ring and join with brown sl st (6) Please look through “Techniques Section” to learn about “Magic Ring” join with a slst. Do not forget to use your stitch marker.
Rnd 2 inc in all sts (12)
Rnd 3-4 sc in all 12 sts (2 rounds)
Rnd 5 (dec) repeat 6 times (6)
Fasten off.
Hair (with brown color)
** With the help of tape measure, we cut 60cm yarn.
If you set the yarns in the middle and do the sowing, there will be equal lengths. To adjust the boundaries of the hair, we place a marker string on the face and temporarily fix it with pins. Hair transplantation process will begin to be made from these limits. Seeding will continue so that no head color appears on the top. I don’t give a certain number for the hair. You can add the hairstyle according to your desire. Just make sure that the skin color does not appear to be obvious. After the hair transplantation process is finished, weave the ends of the tufts firmly with your brown rope. (I made 3 pieces of braids in my design) Please do not forget to follow the images!

Belt (with brown color)
Row 1 Ch 41, turn
Row 2 Starting from the second stitch from the hook; sc in the next 40 sts (40)
Row 3-5 Ch 1, turn, sc in the next 40 sts (3 rounds)
Rnd 6 Ch 2, turn, FLO sc in the next dc, DCinc (60dc)
Rnd 7 Ch 2, turn, Dc2, DCinc around (80dc)
Rnd 8 Ch 2, turn, 80Dc

Shoes (with brown color)x2
Rnd 1 start 6sc in a magic ring and join with brown sl st (6)
Rnd 2 inc in all sts (12)
Rnd 3 [sc in the next 3 sts, inc] repeat 3 times (15)
Rnd 4-6 sc in the next 15 sts (3 rounds)
Rnd 7-9 Ch1, turn, sc10
Ch5 to make the shoe lace and sew it on the opposite side.


