Video – Galeri is a blg web site that have DIY videos
DIY Crochet, we love DIY and Crochet hand works
Dear friends, hello to all of you.
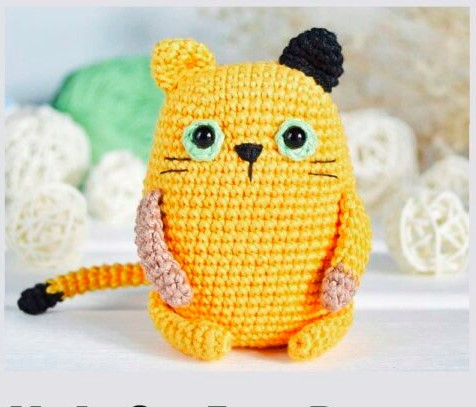
I’ve recently started dedicating a little extra space to amigurumi crochet cat patterns. Crochet cat patterns have started to attract my attention lately. This cute amigurumi cat pattern today is one of them. A pretty small amigurumi. It is the size that you can use as a keychain and can be a very nice keychain.
You can find the making of Amigurumi and its detailed step by step explanation below. I am adding these cute amigurumi cat pictures created with different colors as an example for you. I hope you like this cute crochet kitty. The finished amigurumi cat toy size is 9cm. Start crocheting this free amigurumi pattern now to gift handmade items to your loved ones during the holidays. Have fun.
Little Cat Amigurumi Crochet Free Pattern
Materials and tools
1. About 30g of 100% cotton DK yarn 50g 125m (for example, Vita cotton Lily) or sport yarn
Yarnart eans. Size of the toy make with this yarn is about 9cm.
Colors: color of the body and color of the eyes on your choice.
2. Crochet hook according to your yarn. (I use clover 1.75 or 2.0)
3. Yarn needle, sewing needle.
4. Thread for embroidering the nose (e.g. YarnArt Canarias.) Embroidery or sewing thread for embroidering whiskers.
5. Safety eyes or button eyes diameter 6mm, sewing thread of black color to sew the eyes.
6. Poliester fiberfill.
Abbreviations
MR: Magic Ring
sc: Single crochet
inc: Increase
dec: Decrease
tr: Treble/Triple crochet
TRinc: Work 2 tr sts intothe same st.
dc: Double crochet
hdc: Half double crochet
sl-st: Slip stitch
ch: Chain
st/sts: stitch/stitches
FLO: Front loop only.
BLO: Back loop only.
BL: Bobble Stitch: (Yarn over insert your hook into the st and pull up a loop.Yarn over again and pull through 2 loops) repeat the steps in the same st until you have a total of 5 loops on your hook.Yarn over and pull through all 5 loops at once.
Reverse single crochet: Ch 1, working from left to right, insert your hook into the next st,turn hook to the left side, grab yarn and pull through. There are now 2 loops on your hook. Draw up a loop, bring yarn over the hook again and draw this loop through both loops.
(…)- x times: Repeat the instructions between parantheses x times.
(…): Reprensents the number of sts you should have at the end of the round.

1 rnd: 9ch, start in the second chain from the hook: 1 inc, 6 sc, 3sc in the last st, turn and continue on the other side of the chain, 7sc(18)
Continue crochetiing in spiral.
2 rnd:2 inc, 6sc, 3inc, 6sc, 1inc(24)
3 rnd:(1sc,1inc)x2 6sc, (1sc, 1inc)x3 7sc, 1inc (30)
4 rnd:(2sc,1inc)x2 6sc, (2sc, 1inc)x3 8sc, 1inc (36)
5 rnd:(3sc,1inc)x2 6sc, (3sc, 1inc)x3 9sc, 1inc (42)
6-7 rnds: 42 sc (2 rnds)
8 rnd: 4 sc, 1 inc, 20 sc, 1 inc, 16 sc (44)
9-10 rnds: 44 sc (2 rnds)
If you use safety eyes, first crochet the iris of the eyes, insert the safety eyes into the iris, then insert the eyes into the body between rounds g and io.The distance between the points where you insert the eyes is 7 stitches.
11 rnd: 5 sc, 1 inc, 21 sc, 1 inc, 16 sc (46)
12 rnd: 46 sc
13 rnd: 6 sc, 1 inc, 22 sc, 1 inc, 16 sc (48)
14 rnd: 48 sc
15 rnd: 7 sc, 1 inc, 23 sc, 1 inc, 16 sc (50)
16-20 rnds: 5o sc (5 rnds)
21 rnd: 7 sc, 1 dec, 23 sc, 1 dec, 16 sc (48)
22-23 rnds: 48 sc (2 rnds)
24 rnd: 7 sc, 1 dec, 22 Sc, 1 dec, 15 sc (46)
25 rnd: 46 sc
26 rnd: 2 sc, (1 dec, 3 sc) x 3, 8 sc, (1dec, 3 sc) x 3, 6 sc (40)
27-28 rnds: 40sc (2 rnds)
29 rnd: (3 sc, 1 dec) x 8 (32)
30 rnd: (2 sc, 1 dec) x 8 (24)
31 rnd: (1 sc, 1 dec) x 8 (16)
Stuff the body tightly, but it must not be too round.
32 rnd: 8 dec (8)
Add some fiberfill if you need to.
Cut the yarn leaving a long tail. Close the remaining hole using a yarn needle: weave in the yarn through the front loops of all 8 stitches and pull tightly.
Hide the remaining yarn tail inside the detail.
Tail
1 rnd: 6 sc in MR
2-23 rnds: 6sc (22 rnds)
Fasten off, out the yarn leaving a long tail for sewing.
Arms (make two)
1 rnd: 6 sc in MR
2 rnd: (2 sc, 1 inc) x 2 (8)
3-9 rnds: 8 sc (7 rnds)
Don’t stuff the arms.
Fold the detail and crochet 4 sc joining both sides together. Fasten off, cut the yarn leaving a long tail for sewing.
Legs (make two)
1 rnd: 6 sc in MR
2 rnd: (1sc, 1 inc) x 3 (9)
3-8 rnds: 9 sc (6 rnds)
9 rnd: 4 sc, 1 inc, 4 sc (10)
10 rnd: 10 sc
Don’t stuff the legs.
Fold the detail and crochet 5 sc joining both sides together. Fasten off, cut the yarn leaving a long tail for sewing.
EARS (make 2)
1 rnd: 4 sc in MR
2 rnd: 4 inc (8)
3 rnd: (1 sc, 1 inc) x 4 (12)
4-5 rnds: 12 sc (2 rnds)
Don’t stuff the ears.
Fasten off, cut the yarn leaving a long tail for sewing.
Iris of the eyes (make two)
1 rnd: 6 sc in MR, 1 slst
Don’t tighten the rings too much, we will insert the eyes in them.
Fasten off, cut the yarn leaving a long tail for sewing.
Assembling
Sew on the ears. Sew the arms on rounds 14-16. Sew the legs on rounds 23-26.
Sew the tail in the center of the back approximately on round 25.
Embroider the nose on round so, the length of the nose is 2 stitches.
Sew on the eyes between rounds g and so. The distance between the points where you sew the eyes is 7 stitches. To make the process of sewing easier you may enlarge the holes where the eyes are sewn with the help of tapestry needle or reverse hook end. First match the holes in the body with the holes of the iris. Then sew the eyes over the iris.
Fix the iris with some stitches around. Embroider the whiskers.


