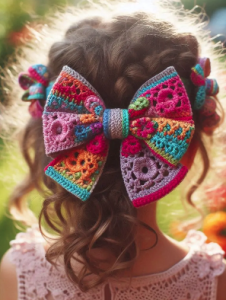
A crochet hair bow is a delightful and stylish accessory that adds a pop of color and handmade charm to any hairstyle. This vibrant bow, made with various colorful yarns and intricate patterns, is perfect for girls of all ages. Its unique design and cheerful appearance make it an ideal project for showcasing your crochet skills and creating a beautiful, personalized hair accessory.
How to Make a Colorful Crochet Hair Bow
Creating your own crochet hair bow is a fun and rewarding project. To get started, gather various colors of yarn, a crochet hook, and some basic crochet skills. Follow the detailed pattern below to craft this beautiful and vibrant accessory that will brighten up any outfit.
Materials:
- Yarn: Various colors (cotton or acrylic yarn is recommended for durability)
- Crochet hook: Size appropriate for your yarn
- Yarn needle
- Scissors
- Hair clip or elastic band
- Fabric stiffener (optional, for shaping)
Abbreviations:
- MR: Magic ring
- Ch: Chain
- Sl st: Slip stitch
- Sc: Single crochet
- Dc: Double crochet
- Hdc: Half double crochet
- Tr: Treble crochet
- Inc: Increase (2 stitches in the next stitch)
- Dec: Decrease (crochet two stitches together)
Bow Base:
- With your chosen main color yarn, ch 30 (or desired length for the bow).
- R1: Sc in 2nd ch from hook and across (29)
- R2-6: Ch 1, turn, sc in each st across.
- Fasten off and weave in ends.
- Fold the rectangle in half lengthwise and sew the edges together to form a loop.
Bow Center:
- With a contrasting color yarn, ch 10.
- R1: Sc in 2nd ch from hook and across (9)
- R2-4: Ch 1, turn, sc in each st across.
- Fasten off and weave in ends.
- Wrap the small rectangle around the center of the bow base and sew the ends together to secure.
Granny Squares:
- With various colors of yarn, create a MR.
- R1: Ch 3 (counts as dc), 2 dc in MR, ch 1, 3 dc in MR, ch 1 repeat 3 times, join with sl st to the top of ch 3 (12 dc, 4 ch-1 spaces).
- R2: Sl st to the first ch-1 space, ch 3, 2 dc in same space, ch 1, 3 dc in next ch-1 space, ch 1, 3 dc in same space, ch 1 repeat 3 times, join with sl st to the top of ch 3 (24 dc, 8 ch-1 spaces).
- Fasten off and weave in ends.
- Create enough granny squares to cover the bow base.
Assembly:
- Arrange the granny squares on the bow base as desired.
- Sew the granny squares onto the bow base using a yarn needle and matching yarn.
- Attach a hair clip or elastic band to the back of the bow using a yarn needle and yarn or hot glue.
Optional:
- Apply fabric stiffener to the bow to help it hold its shape better.
- Add beads or other embellishments to the center of the granny squares for extra detail.
Enjoy creating this colorful crochet hair bow and adding a touch of handmade charm to your hairstyle!
https://www.facebook.com/besthomedecoration2024/videos/338105582604087


